
Have you ever wanted to take a photo of your screen?
Maybe your IT guy is asking you what’s wrong with your computer, and you have no idea how to describe it.
Or maybe you saw a great video, and it’s moving too fast to read.
Capturing what you see on your screen by taking a screenshot is useful for a few reasons:
1. Save information: Take a screenshot to save recipes, videos, articles, graphs, etc. and read them at your leisure.
2. Share information: Send a screenshot to friends and family with a few taps of a button. This is especially useful in social media or text messages.
3. Capture errors: Use a screenshot to show tech support exactly what you’re seeing.
4. Save time: Taking a screenshot is quicker than copying information by hand.
But first…
What is a screenshot?
A screenshot is a picture taken by your device that captures the visible items on your screen. The picture is stored as a static image file, readily available for you to pull up later for reference.
Some people may call it a screen grab or screen capture.
Do I need to buy software to take a screenshot?
Nope! Screenshot functionality is built into your device’s operating system. And it’s really easy to do.

How to take a screenshot on a Windows PC or laptop
Capture the Entire Screen
- Hit Print Screen or PrtScrn or Alt+PrtScren or Alt+Fn+PrtScrn (what you see on your keyboard depends on your computer)
- Open your preferred program like Microsoft Word, Paint, or Adobe Photoshop
- Paste the screenshot to view, edit, or save your image
Capture a Part of the Screen
- Hit Windows Key+Shift+S
- Open your preferred program like Microsoft Word, Paint, or Adobe Photoshop
- Paste the screenshot to view, edit, or save your image
Use Snipping Tool
Your Windows device may come with a program called Snipping Tool.

- Open Snipping Tool in your taskbar or list of programs
- Click New to select the part of the screen you want to capture, or Options to see other options
- Select File to save, email, or print your screenshot
How to take a screenshot on a Mac
To take a screenshot on a Mac, you have two options.
Capture the entire screen
Command (⌘)-Shift-3
Hit these keys at once to take a screenshot of your entire visible screen.
Capture a part of the screen
Shift-Command (⌘)-4
Hit these keys at once to select the part of your screen you want to capture.
This is useful when you only want to screenshot a specific portion of your screen like an error message.
Advanced screenshot options (MacOS Mojave only)
Shift-Command (⌘)-5
Hit these keys at once to see different screenshot options. You can capture still images, or record video of your screen.
How to take a screenshot on your Android

Hold down the Power button and Volume Down button
- Press and hold the Power button
- At the same time, press and hold the Volume Down button
- If your screenshot is successful, your phone will make an audible click (if your sound is enabled)
- Find your screenshot in the Screenshots folder of your image gallery
Note: Pressing these buttons down together can be tricky. Keep trying, and soon you’ll be a screenshot pro! Or, try the options below.
Ask Google Assistant or Bixby
- Activate your virtual assistant by saying “Hey Google” (for Google Assistant) or “Hi Bixby” (for Samsung Bixby)
- Ask your assistant to take a screenshot (try this: “Hey Google, take a screenshot”)
- Find your screenshot in your images gallery
Using Palm Swipe (For some Samsung phones)

- First, enable Palm Swipe
- Go to your phone’s Settings
- Search for and select Palm Swipe to capture
- Set your hand vertically on the left or right edge of your screen like you’re going to karate chop your phone
- With your hand in position, swipe horizontally across the screen like your hand is scanning the screen
- Note: This may take a few tries to be successful
- If your screenshot is successful, your phone will make an audible click (if your sound is enabled)
- Find your screenshot in the Screenshots folder of your image gallery

How to take a screenshot on your iPhone or iPad
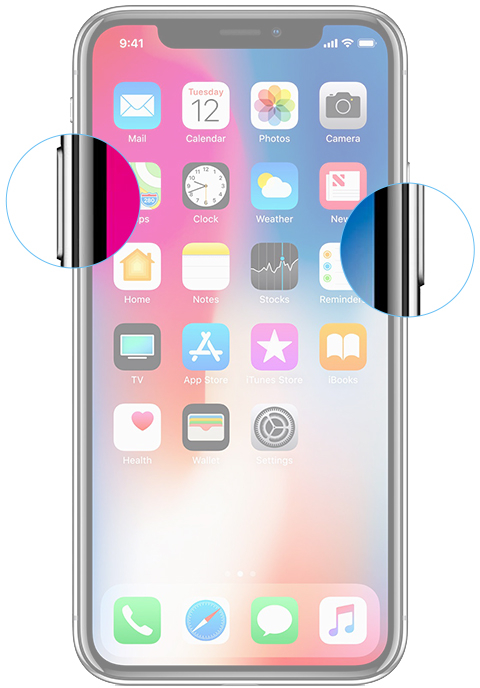
For iPhone X or later
- Press and hold the right Side button
- At the same time, press the Volume Up button
- Your screen will flash white and you will hear a click like a camera shutter if your sound is enabled
- Find your screenshot by going to Photos > Albums > Screenshots
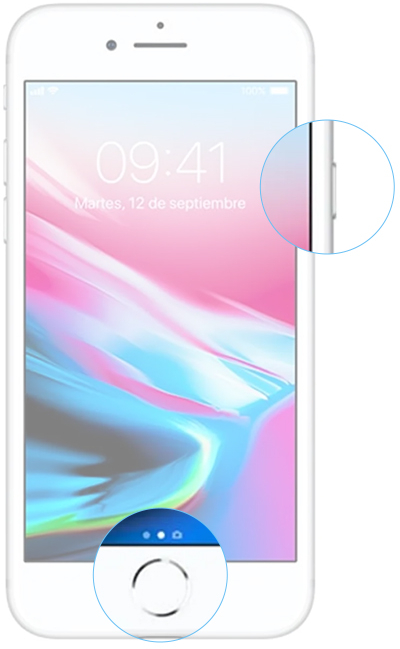
For iPhone 8 or earlier
- Press and hold the Power button located on the right side of your phone
- At the same time, press the Home button
- Your screen will flash white and you will hear a click like a camera shutter if your sound is enabled
- Find your screenshot by going to Photos > Albums > Screenshots
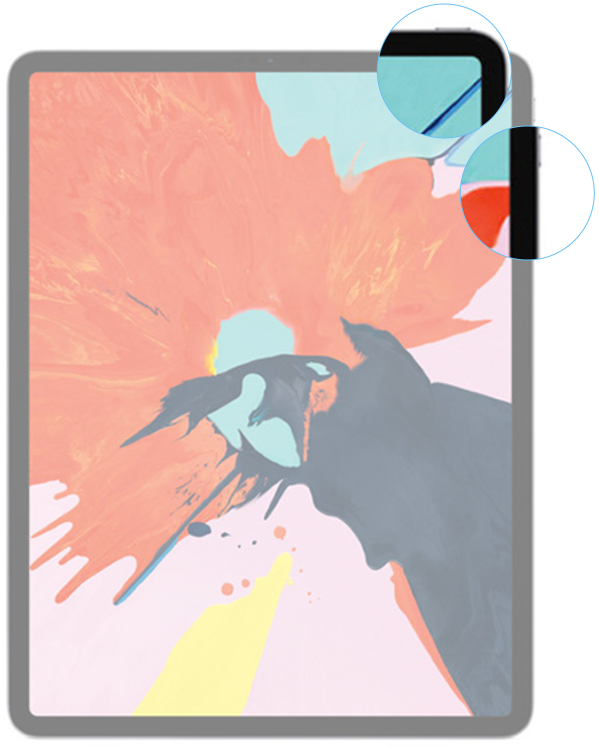
For the 2018 iPad Pro (no home button)
- Press and hold the Top button
- At the same time, press the Volume Up button
- Find your screenshot by going to Photos > Albums > Screenshots

For all other iPads (with home button)
- Press and hold the Top button
- At the same time, press the Home button
- Find your screenshot by going to Photos > Albums > Screenshots
And that’s it! Easy enough, right? Knowing how to take a screenshot is an easy shortcut that can save you time.
When to take a screenshot
You can probably think of a lot of things to screenshot now! But here are some ideas to get you started:
- Screenshot boarding passes and QR codes to make check-ins to flights and events as simple as possible
- Remember event details by taking a screenshot of the invitation
- Capture digital receipts like payment confirmations for your records
- Never forget another grocery item: Screenshot items from text messages or from your grocery app to make it easy to find
- Create a “wishlist” by screenshotting items you’d like to buy in the future – perfect for birthdays, holidays, or to treat yourself
- Share computer errors and problems with tech support
- See something funny online? Screenshot it, and share it with friends via text or social media
- At work, take a screenshot of presentations or important emails so they travel with you
Test it out and you’ll master this little hack in no time!