If you are experiencing the following below, you can use the Windows Restore Point to get your previous settings back.
- Can’t Boot Computer Normally After Installing a program
- Unable to Start Computer After Installing a System Driver
- Windows Won’t Start Correctly After an Update is Applied
- Seeing only a Black Screen When Starting the Computer
The System Restore Point is an option that enables you to go back to an earlier point in time.
A restore point is created when you install new software, drivers, or Windows updates. Also, you can manually create a restore point.
Restoring will not impact your personal files, but it will delete any apps, drivers, or updates that were installed after the restore point was created.
Start Windows System Restore from Normal Boot.
Step 1. Go to your Start menu, and in the Search box, type: Recovery.
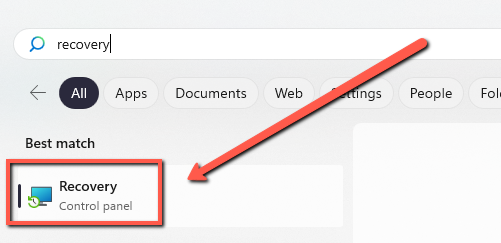
Step 2. Select the Recovery.
Step 3. Open System Restore.
Step 4. In the Restore system files and settings box, select Next.
Step 5. Choose the restore point you would like to start from in the list of results, and then select Scan for affected programs.
Start Windows System Restore from a Black Screen.
Step 1. Restart your computer a few times. Repeating this will bring up the Windows Startup Automatic Repair screen. Select Advanced options.
Step 2. Click System Restore.
Step 3. When System Restore opens, select a system restore from a period before you started experiencing black screen issues.
Step 4. Press Next, wait for the process to complete, and check if it works.
If you continue to experience issues, please get in touch with us.
Happy fixing,
Chris & the WinZip Team