Graphics driver is the software that allows the programs and the operating system to use the graphics hardware of the computer efficiently. No matter if it is a text or image, the graphics driver manages the screen for the websites, video streams, and games.
In case you are a fan of PC games, you need to keep the graphics driver up-to-date to ensure the best performance. If everything appears blurry or the games are not running clearly, the issue is with the graphics driver. Now, let’s move on to how to update graphics driver on your computer.
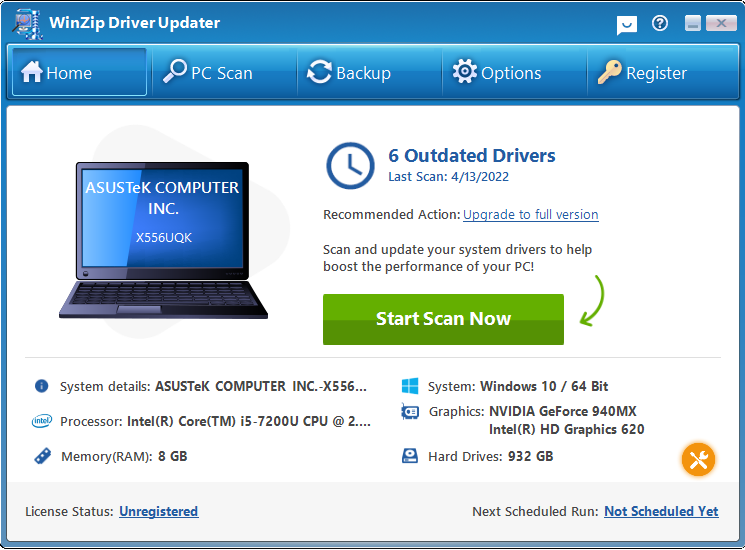
How to Update Graphics Driver Automatically
Upgrading your graphics card manually might be an arduous task. Moreover, new drivers are being released every month. So, it might be difficult to always have the latest updates.
It can be tiring to hunt for the latest upgrade for any individual. This is the reason you should use an automated and straightforward method.
WinZip Driver Updater is a one-stop solution for keeping graphics drivers up to date. Apart from this, it will check other things like outdated printers, network, and sound drivers. Then it installs those drivers automatically for your convenience. So, you only need to use it once and get all your drivers updated within minutes.
How to Update Graphics Drivers Using Windows Update
Another method to update the graphics driver is by using the built-in tool of Windows known as Windows Update. It is available by default on your computer. Even though these drivers aren’t the latest ones, they are quite stable.
Want to know how to update graphics driver? You can use the below steps for the same.
For Window 7
- The first step is to go to Windows Start menu. From there, visit the ‘Control Panel’.
- Next, click on the option ‘System and Security’ and then on ‘Windows Update’.
- Now, you have to click on ‘Check for Updates’. This will start the check for latest updates and look for the new drivers, too.
- Track down graphics card mentioning manufacturer names associated with the graphic component like AMD, NVIDIA, and Intel Graphics. You will find them under ‘Optional Updates’ or in the main window. In case you come across one of the graphics card drivers, you need to install them manually.
For Window 10
- Go to ‘Start Menu’ and then click on ‘Settings’.
- Next, choose ‘Windows Update & Security’. It will check the latest updates in this section.
A GPU driver will be automatically installed.
How to Update Graphics Drivers Using Windows Device Manager
In most cases, Windows Update will not find an update for graphics driver automatically. While most of the companies manufacturing graphics hardware generally release new updates monthly. However, sometimes it takes time for the latest updates to be verified by Microsoft.
When it comes to the Windows update, a date will be available alongside each entry. In case the graphics driver is not updated for more than 3 months, use Windows Device Manager. But before you proceed, make sure that you create a backup.
How to Update Graphics Driver on Windows 7
- On the desktop, right-click on ‘Computer’ icon and click on ‘Properties’. From there, navigate to ‘Device Manager’.
- Next, go to the option ‘Audio, Video and Game Controller’. Check details for the graphics card. Remember, you are looking for something saying Intel, VGA, NVIDIA, AMD under the heading ‘Display Adapter’.

- When you find the graphics card entry, double-click on it and go to ‘Driver tab’. Now, click on the option ‘Update Driver’.
- Choose the ‘Search automatically’ option.
- In case that doesn’t show anything new, you should not always have to worry. However, if you have to make sure, repeat the first three steps and rather choose to browse the computer for driver software.

- Once you find the driver, check if it came with the installer. In case it didn’t, download it from the official website.
- Next, you have to choose the option ‘Have Disk’ and then on the option ‘Browse’. Look for the folder of new graphics you downloaded.
- Click on ‘Next’. It will update the graphics card.
- The process is now complete.
How to Update Graphics Driver on Windows 10
- Go to the ‘Start menu’ and then type on ‘Device Manager’.
- Check the details in the list which is related to the graphics card. It can be ‘graphics’, ‘Intel Graphics’, ‘Standard VGA Controller’, NVIDIA GeForce’, and ‘AMD Radeon’.
- Right click on the graphics card. There is a separate ‘Driver’ tab. So, click on it to check the options. Next, click on ‘Update Driver’.
- Select the option Automatically update driver’. If it doesn’t find the latest driver update, repeat the first 3 steps and choose ‘Browse my computer’.
- You have to download the driver from the official website of the manufacturer.
- Next, click the option ‘Have Disk’ and then on ‘Browse’.
- Click on ‘Next’. Now, you have updated graphics drivers.
Conclusion
Updating your drivers is important for a computer. It is the key to getting the best possible visual experience and top performance. With the help of the above-listed methods, you can easily update the graphics driver. The easiest way is to use WinZip Driver Updater to keep your graphics driver as well as other drivers up to date all the time. No need to manually search, download, and install the drivers one by one. WinZip Driver Updater will take care of everything with a single click.